The next day

Step 6 – Shape and proof
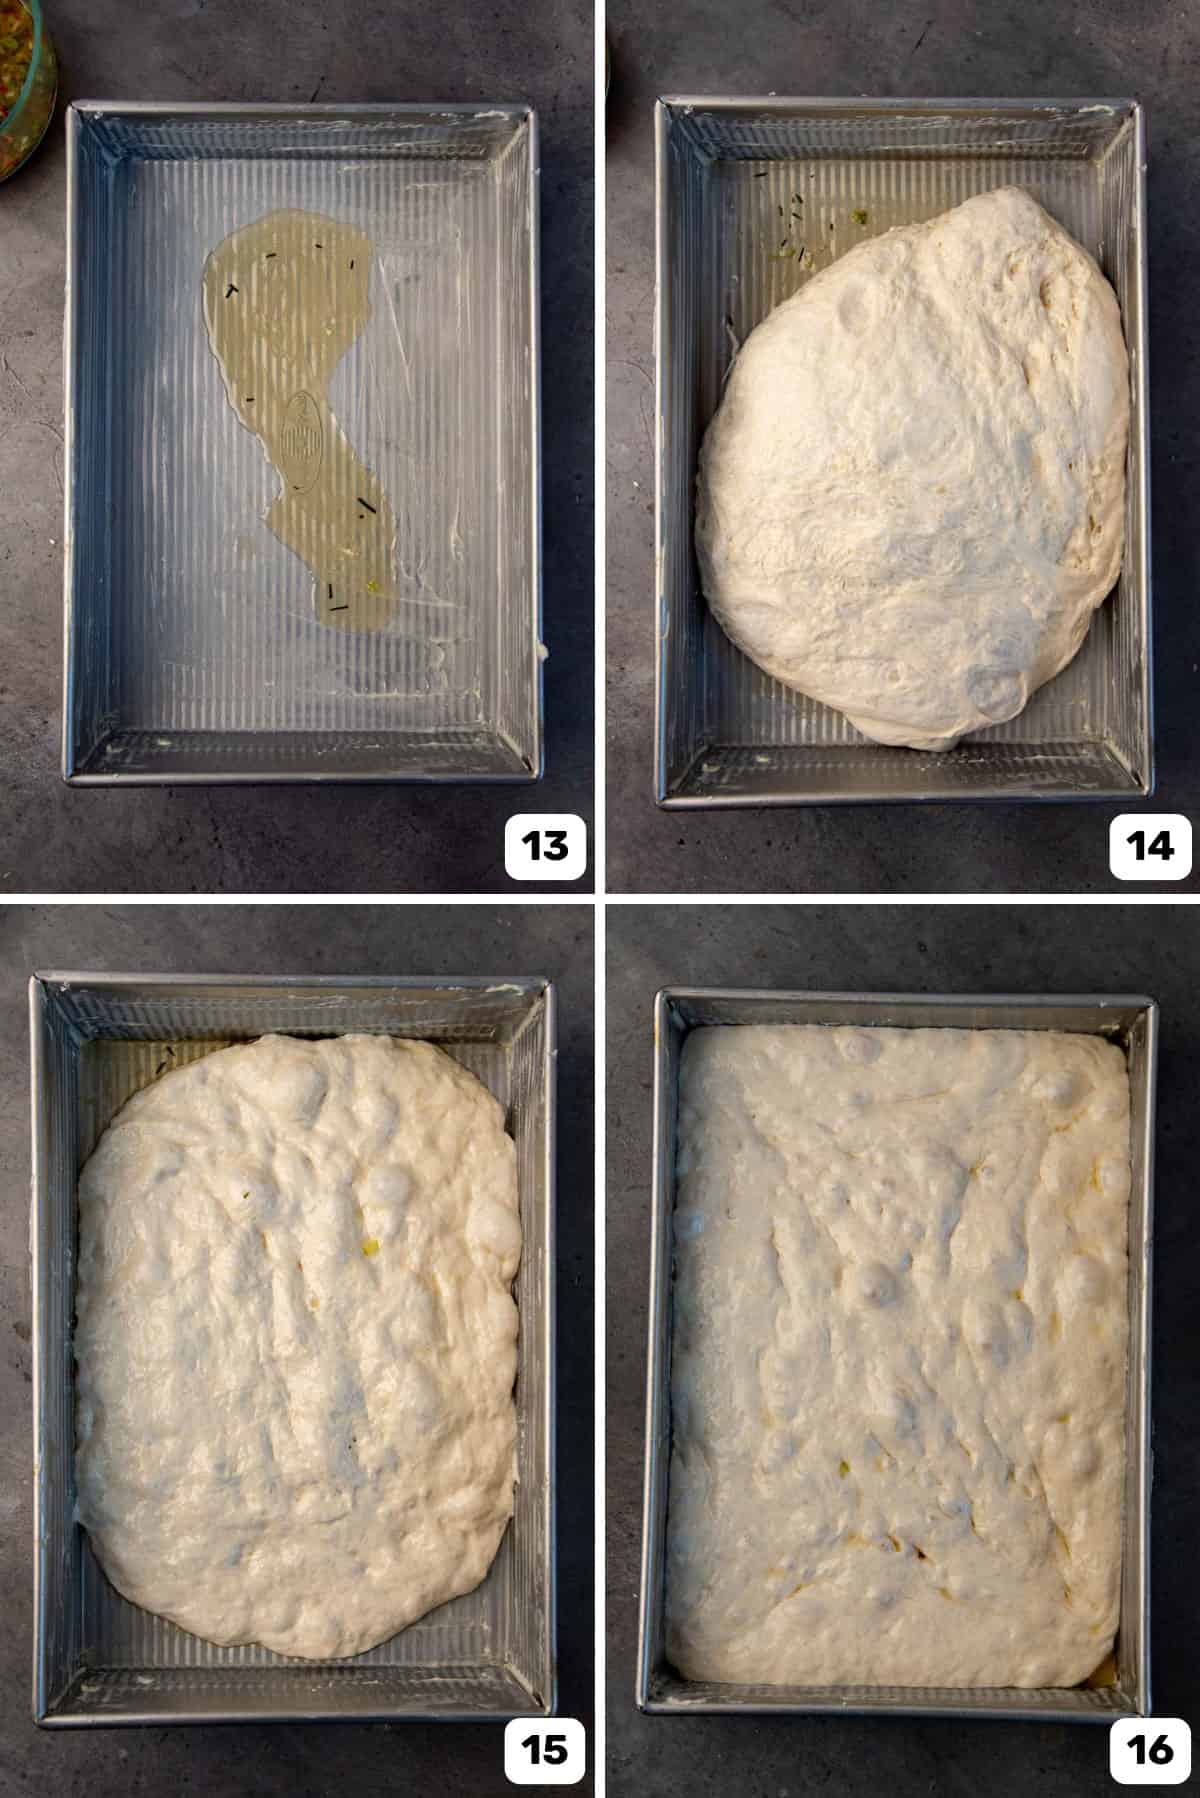
Take your 9 x 13 inch baking pan and add about 2 – 3 tablespoons of the infused oil into the bottom of the pan (image 13). Spread the oil generously over the whole bottom and sides of the pan.
Alternatively, you can apply a thin layer of butter first and then add the flavored oil.
It is absolutely OK if some of the chopped herbs get into the pan with the oil.
Hold the dough bowl over the baking pan and give it a little shake to transfer the dough. The dough should slowly pop out of the bowl and into the oiled pan.
Gently flip the dough over in the pan, so that the entire dough gets lightly coated with the oil (image 14). Stretch or fold the dough to form a rough rectangle (image 15). It doesn’t have to fit the whole pan, but should be in the shape of the bottom of the pan.
Cover the pan with plastic wrap and let it come to room temperature. During this time, check on the dough every 15 – 20 minutes, and gently stretch the dough so it fits the bottom of the pan (image 16).
Once the dough is stretched to fit the pan, AND it’s at room temperature, let the focaccia proof in a warm place until the surface looks bubbly, and wobbles like jello when you shake it. This can take anywhere from 1 – 3 hours, depending on room temperature.
Preheat the oven to 425 F.


Step 7 – Add the flavoring and dimple the dough.
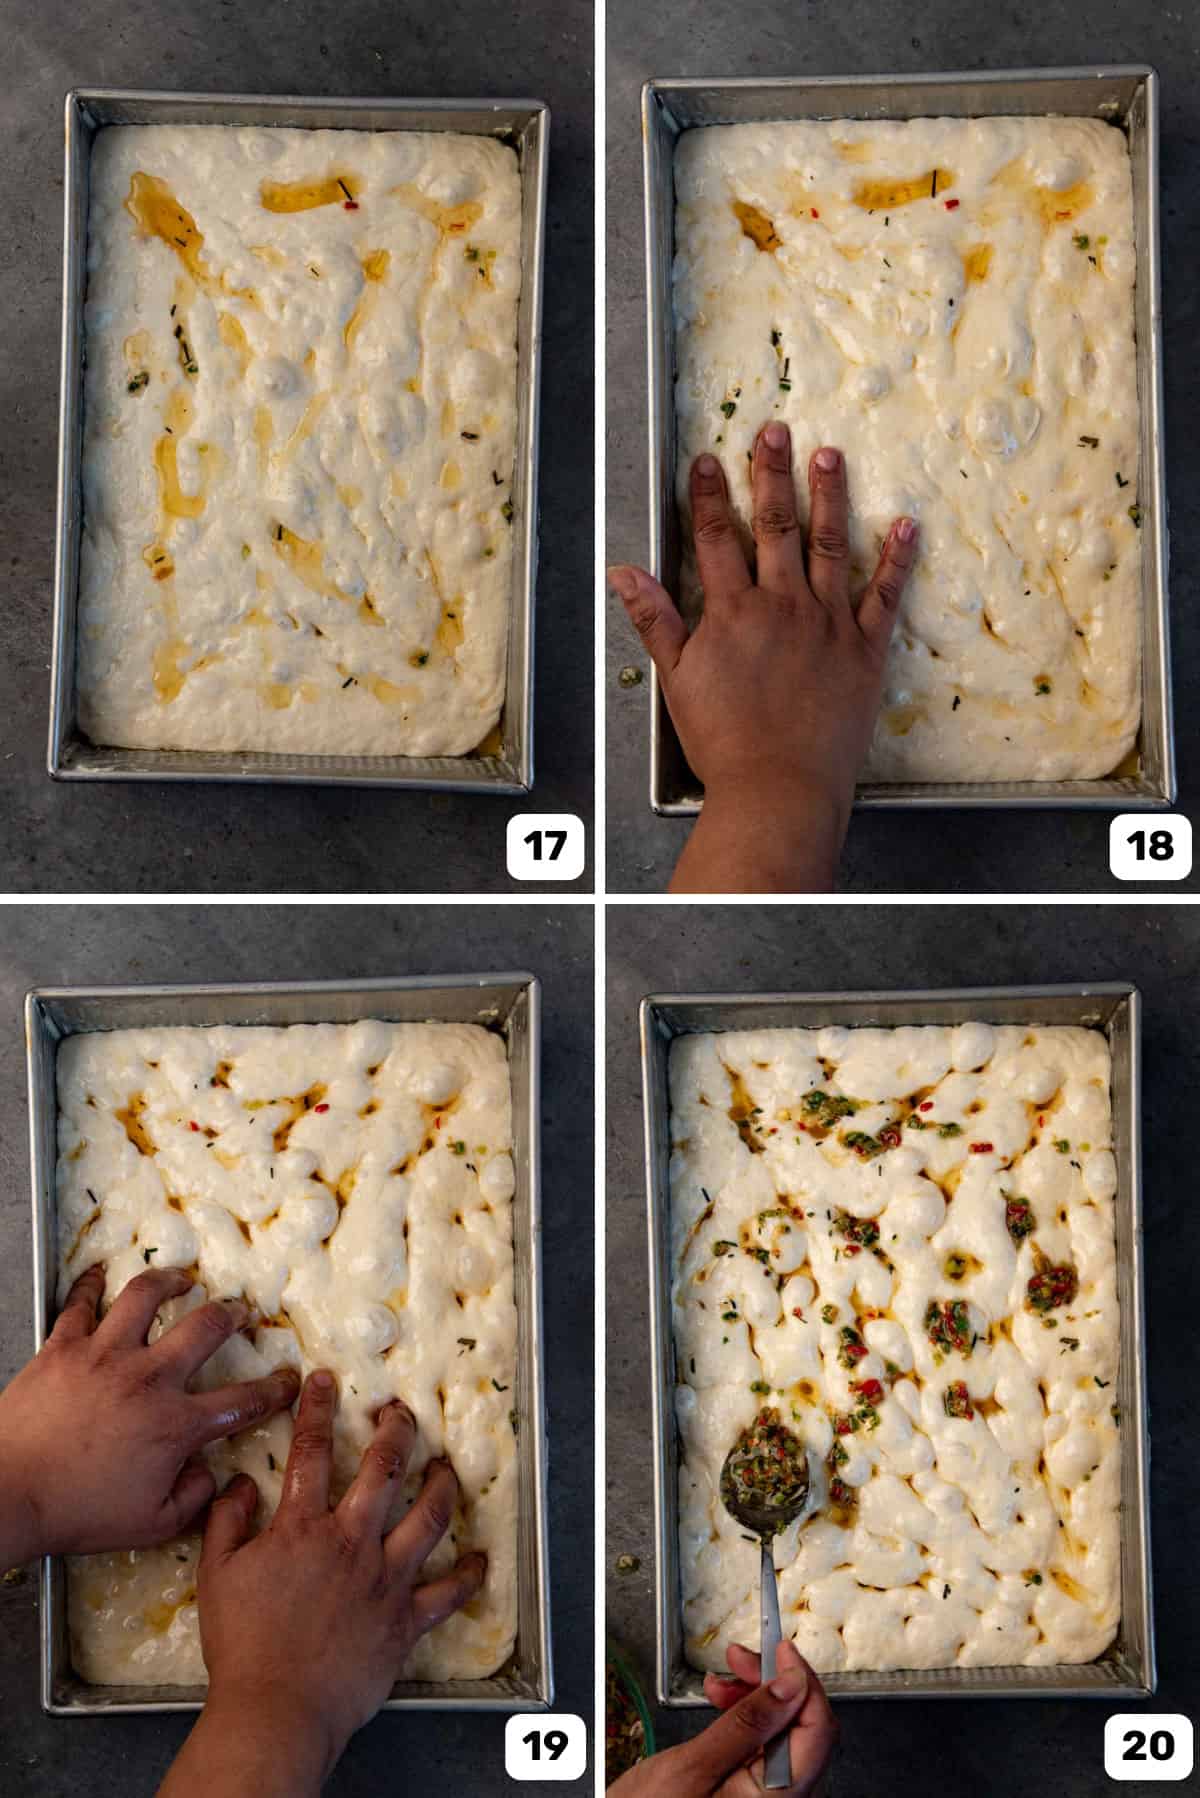
When the focaccia has proofed, drizzle 1 – 2 tablespoons of the infused oil and gently spread it over the surface of the dough (images 17 – 18). Take some of the chopped herbs in the infused oil and dot the surface of the focaccia too. You can add more before it goes into the oven.
Next is the fun part – dimpling the dough! Make sure your hands are clean and dry, and coat them with some oil. Press into the dough using your fingers (image 19). It’s OK for your fingers to go right to the bottom of the pan without breaking the bottom of the dough, but it’s ok if you accidentally pierce through as well, as it will all be covered once baked.
This dimpling action causes some of the air pockets to puff up, causing an even more bubbly surface. If you made a low hydration dough, the dimpling will create noticeable dimples in the dough.
But with high hydration focaccia, the dimples won’t be as visible, because of the larger air pockets formed around them.
Drizzle more of the chopped herbs on top, if any spots are missing them (image 20). If you did not add salt to the herb and oil mix, then sprinkle the top of the focaccia with flaky sea salt as well.


Step 8 – Bake and serve.
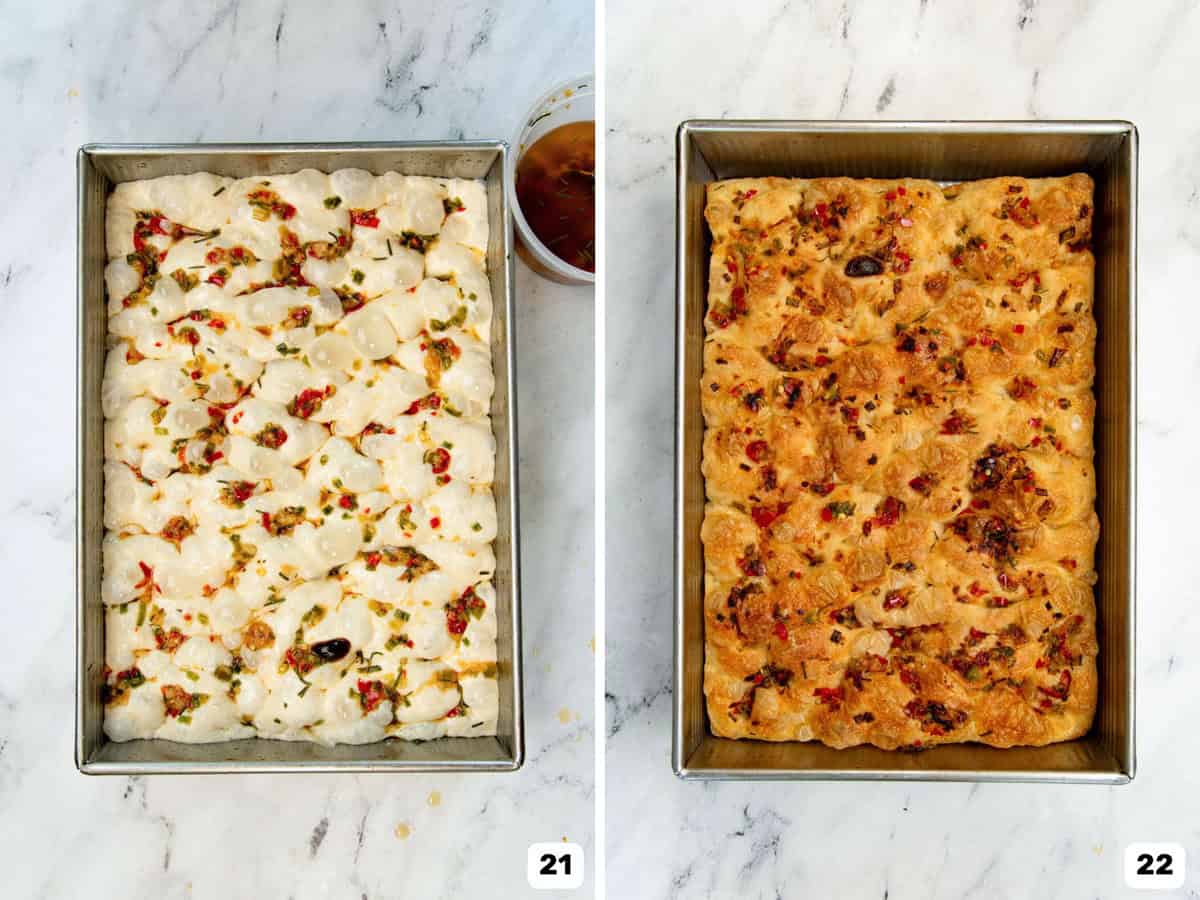
Once the focaccia has been dimpled and the spice and herb mix has been dolloped all over, it is ready to be baked (image 21). Bake the focaccia in a preheated oven for about 20 – 25 minutes. The time will very much depend on your oven. These instructions are for a conventional oven, one that has heat elements from the top and bottom.
Place the focaccia in the bottom rack of your oven. In my oven, I place it on the rack that is at the lowest position. Bake for at least 15 minutes, or until the bottom of the focaccia is nice and golden in color.
Once the bottom has caramelized, switch the pan to a higher rack to caramelize the top.
Please note – The cook time will vary slightly from oven to oven. So, it helps to know how your oven works. With my oven, I bake the focaccia for about 25 minutes, on the bottom rack the whole way through. It caramelizes the top perfectly as well, while also creating a golden brown crust on the bottom.
But in other ovens, I have had to move the baking pan up to the upper third rack to properly caramelize the top.
Once the focaccia is baked, and has become golden brown, remove the pan from the oven (image 22). Let it cool down just enough so that you can handle it comfortably with gloves.
Transfer the warm focaccia onto a wire rack. I like to eat it while it’s still warm, but you can serve it at room temperature too.
Serve it just as is, OR with a small bowl of the infused oil and chopped herbs as a dip.


